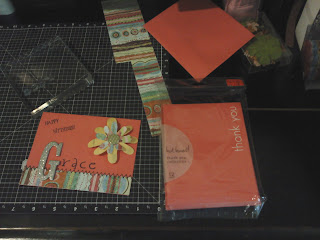
First, I started with some clearance rack cards. These were great - they were in beautiful, bold colors - pink, green and purple, and came with matching envelopes, and the best part was, they were marked down less than $2 for a pack of 12 (and these are standard size, too!). The key to these is that I didn't find them at a scrapbook store - I found them at my local Target in the card aisle when I was doing some last minute Hallmark shopping. I scooped up a bunch of them, even though emblazoned across the front of each was a big "THANK YOU", knowing I could put those to good use for a variety of occasions.
Fast forward to today. I wanted to make a card for my sister's birthday, and I wanted it to be something special and personal. I only had a short amount of time to do it in, so I started with the basics. I grabbed:
- A pack of the Thank You cards
- My scrap paper folder (don't have one? You need one... read below to find out more!)
- My 'occasions' caddy of stamps (I keep my stamps organized by theme, so they're easy to grab when I need them)
- My new paper flowers, also made from scraps
- and, finally, My mixed alphabet bag (read below for more on this, too).
Next time you start a card project, look around you for the items you've been wanting to use in your scrapping or cardmaking, and just can't seem to find a home for. Try sorting items by like colors or patterns, and you may find a whole new life for those product misfits!
Now, back to a few of my notes above:
Scraps Folder
For all pieces of paper that are at least 12" long, OR 6" wide, I store them in a paper sorter (can find at your local scrapbook store, much like an expanding photo keeper, only larger. Or, you could use a standard office expanding folder). I use the dividers to sort the papers by style and color, so that they're easy to find and use for my next project. This is the folder I looked to when making my paper flowers last week, and it's where I go for cards, scrapbook pages, tags, and other accents and embellishment uses. I find I'm more likely to use them when they are neat and sorted than when I have them tucked here and there amongst my piles of paper, virtually lost among the stacks.
Mixed Alphabet Bag
I keep a freezer size ziploc bag full of my misfit, leftover and partial alphabet collections. When an alphabet reaches a point that it's no longer complete enough to be useful, I tuck the leftover in here. I keep my chipboard letters, stickers, rub-ons, die cuts and more in here. They are great for accents like what I used on this card, to start titles in scrapbooks, or for a whimsical page, they're great for the entire title or journal, to give it a hodge-podge feel. Just another way to stretch every last dollar out of those scrapping supplies!
Have a good week, and Happy Scrappin'!
Oh, and PS - Completely off the subject, but I got a new scrapping desk at auction this weekend (again, another bargain buy!) and I'm in love! It's cozy, and girly, and holds all my basics, and because it's a rolltop, it fits in well enough with our living room decor, I can work right there while my daughter Hayden plays! This is going to help me get so much more accomplished! I am having almost as much fun arranging it as I will scrapping at it!


No comments:
Post a Comment